Contents +
WordPress Online Website Building Tutorial (Part 1): From Purchasing a Domain to Completing the Basic Website Setup
Source: 创同盟
Date: 2026-10-16
Views: 89
You've probably heard the saying: You don't need technical skills to build a website these days.
That statement is half right.
It's true that you don't necessarily need to know how to code to build a website these days. But if you don't know anything and just think about finding a tool and clicking a few times, the website you create will probably only stay at the "visible" stage.
What you really don't need is to write code; what you do need are two other abilities: to clearly understand the requirements and to be willing to take action.
We have already introduced what WordPress is and how to use Studio to build a WordPress test site locally .
However, local testing and the official website launch are two different things.
A local website can only run on your own computer. If you want others to access your website via the internet, you need to prepare a domain name, hosting, and install WordPress in an online environment.
This article will guide you through the process step-by step, from buying a domain name and choosing hosting, to installing WordPress, setting up themes and plugins, following the normal website building sequence.
The complete online website building process is divided into two parts. This is the first part, which will guide you through the basic setup of your website. Website content, launch acceptance, security backup, and speed optimization will be covered in the next part , "WordPress Online Website Building Tutorial (Part 2)" .
Let's take Hostinger as an example. It offers a one-click WordPress installation feature, which is quite user-friendly for first-time website creators. Although the backend interfaces differ between hosting providers, the overall concept is basically the same.
First, before starting work, think clearly about one thing.
When building a website, the first thing many people do is open the tools and start choosing a theme and installing plugins.
After working on it for several days, I realized: I had a website, but I didn't know what to put on the homepage or who it was for. In the end, I could only make changes as I went along.
Therefore, I suggest you ask yourself this question before you begin:
Who is this website for, and what tasks are required to be completed?
for example:
The goal is to get potential customers aware of your products and services, and then get them to contact you. (lead generation)
I want to write my own articles and gradually build up my readership. (Content)
I want to provide a formal website entry point for people who already know me. (Demonstration)
We want to sell products directly through our website. (Transactions)
The website configuration required for these different uses may be completely different.
For example, enterprise lead generation websites need to focus on product display and contact forms; content blogs pay more attention to article management and reading experience; and if you want to sell products online, you also need to consider payment, order and product management.
First, clarify the purpose of the website, and then decide which features to install.
Otherwise, you might spend money and install a bunch of plugins, only to find that most of them are completely useless.
Step 1: Prepare the domain name and hosting.
While the WordPress open-source software itself is free to use, to actually put a website on the internet, you usually need to prepare two things: a domain name and hosting.
You can think of a domain name as the address of a website, and a web host as the place where website files are stored.
1. How to choose a domain name?
A domain name is the address that someone enters when visiting a website, such as `example.com` .
Choosing a domain name isn't that complicated; just remember a few key points:
Keep it as short as possible so that others can remember and type it.
Use fewer complex numbers, hyphens, and words that are difficult to spell.
For corporate websites, brand names should be given priority.
There's no need to cram a lot of keywords into your domain name just for SEO.
Another thing that's easy to forget: domain names usually need to be renewed regularly.
It is recommended to set up renewal reminders after purchase, and enable automatic renewal if possible. For corporate websites, the domain name should ideally be registered under an account that the company can manage long-term.
2. How to choose a host computer?
The choice of hosting depends mainly on where your visitors are located.
| Your situation | Host selects direction | Note |
|---|---|---|
| The main visitors are from mainland China | Domestic cloud servers | ICP registration is usually required according to regulations. |
| The main visitors are overseas | Overseas hosting or cloud server | Focus on access speed in the target market |
| Targeting multiple countries and regions | Suitable server plus CDN | Note the access experience in different regions. |
| First time building my own website | Hosting that supports one-click WordPress installation | Priority should be given to ease of operation and technical support. |
If this is your first time building a website, it is not recommended to buy a high-spec hosting service from the start.
Setting up the website and figuring out the whole process is more important than buying performance that you won't need right now.
This article uses Hostinger as an example. Its management backend is called hPanel, where you can manage websites, domains, and some hosting functions.
Official website: https://www.hostinger.com/
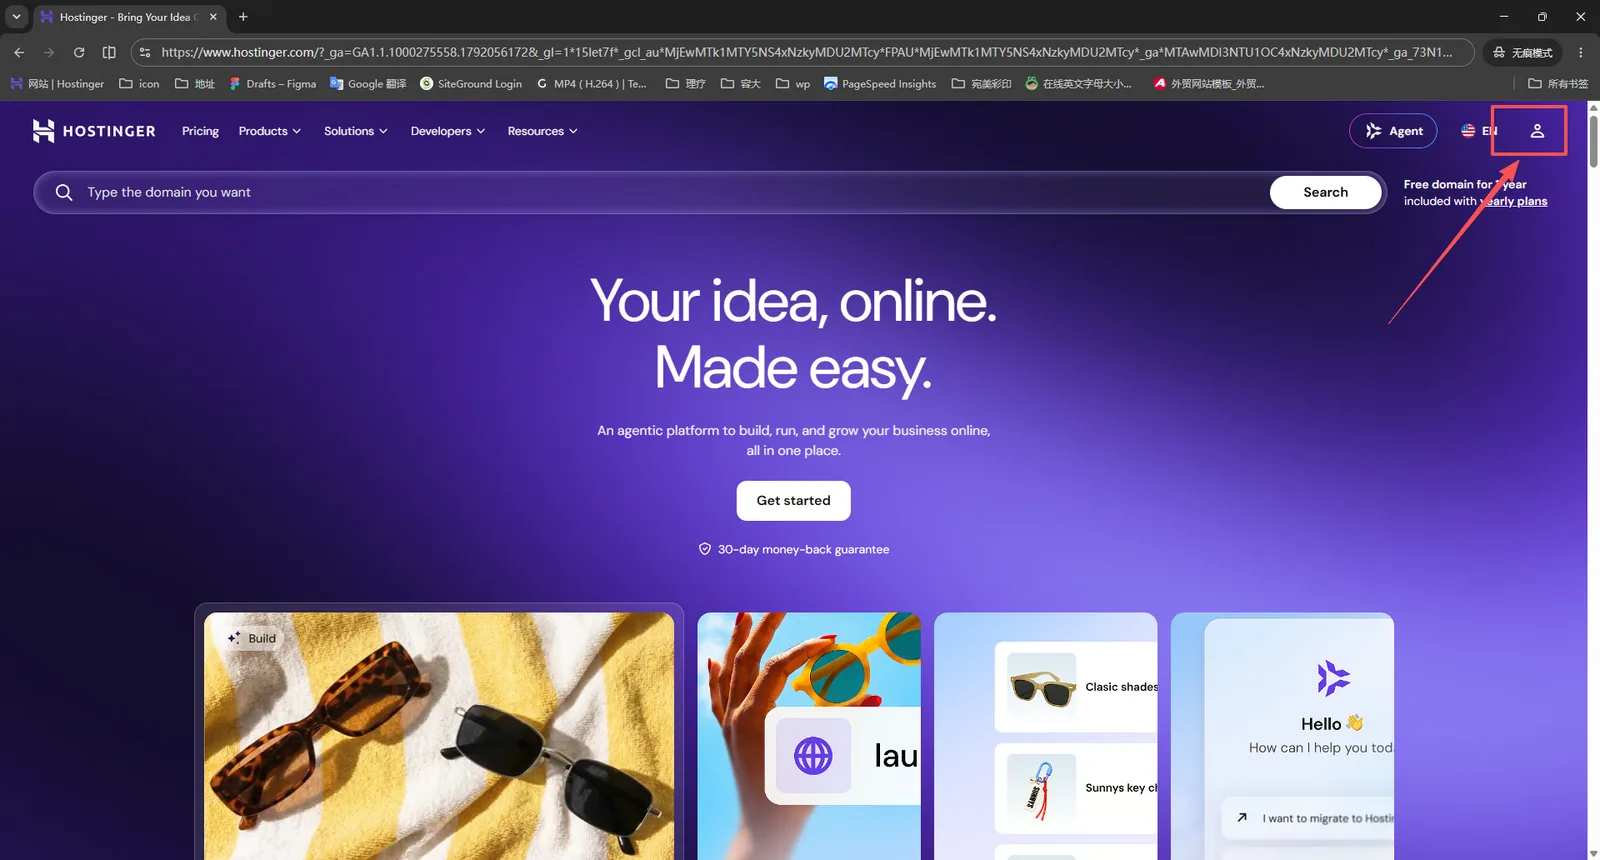
When choosing a hosting service, you can ask yourself three questions first:
First, is it possible to install WordPress with one click?
Second, is there an automatic backup function, and how exactly does it restore?
Third, can you find technical support when you encounter problems?
Of course, before making a purchase, you should also check the renewal price, server location, and package restrictions. Don't rush to place an order just because you see the first-year discount.
Step 2: Installing WordPress is actually not as complicated as you might think.
Once the domain name and hosting are ready, you can officially install WordPress.
Previously, building a website might have required uploading the program, creating a database, and configuring the server yourself. Now, many hosting providers have integrated these steps into the backend, allowing even beginners to follow the prompts to complete the process.
The following instructions use Hostinger as an example.
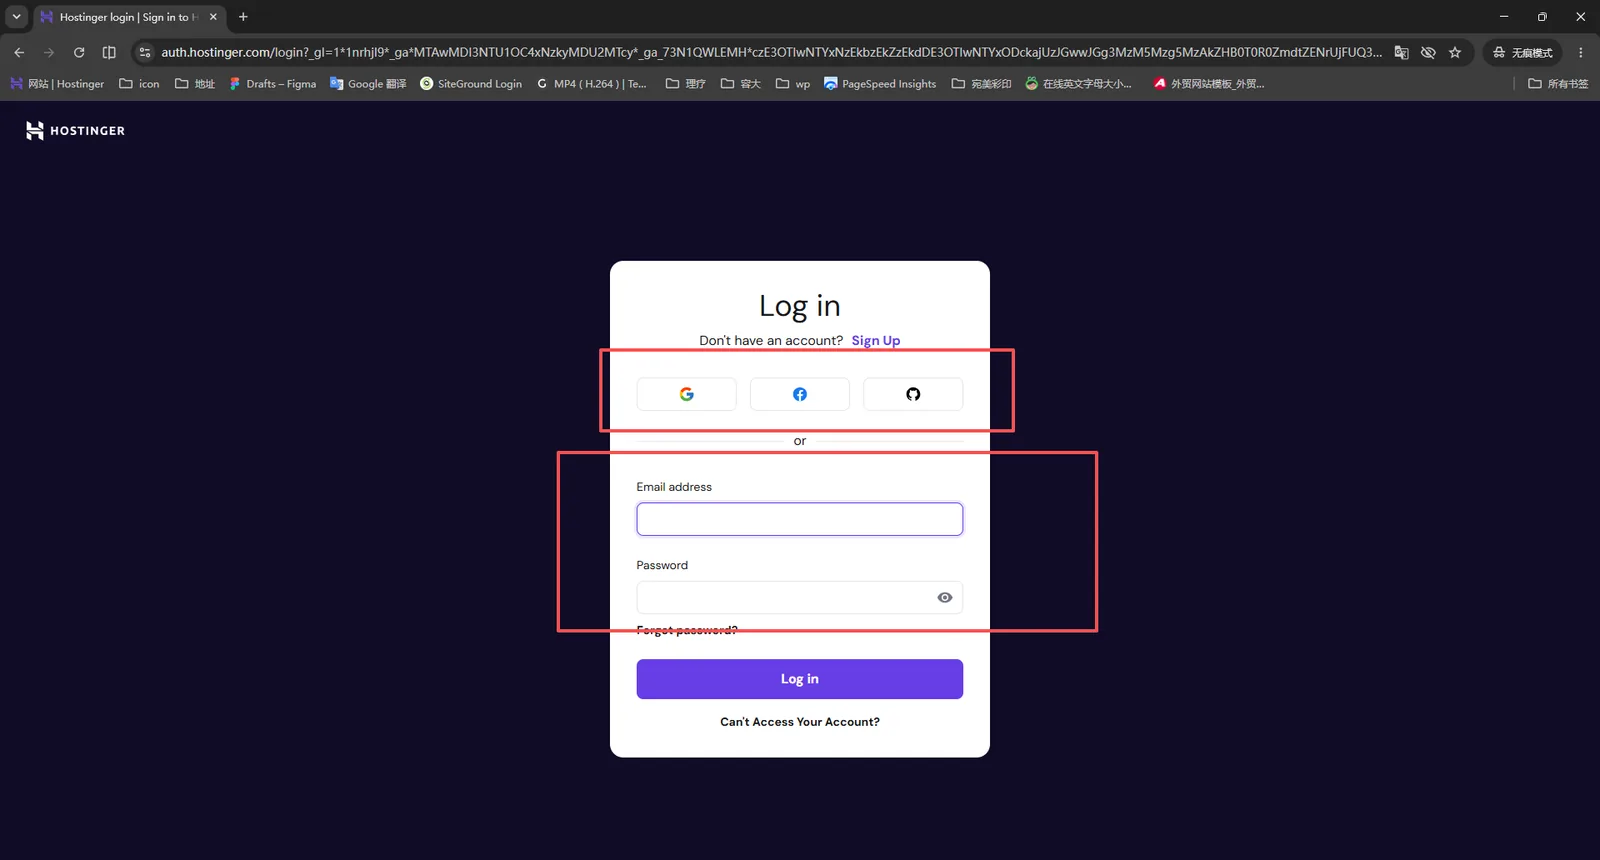
1. Log in to the hosting control panel.
First, open the Hostinger management backend:
Log in using the account you registered when you purchased the hosting service.
Once logged in, you will see the website management page.
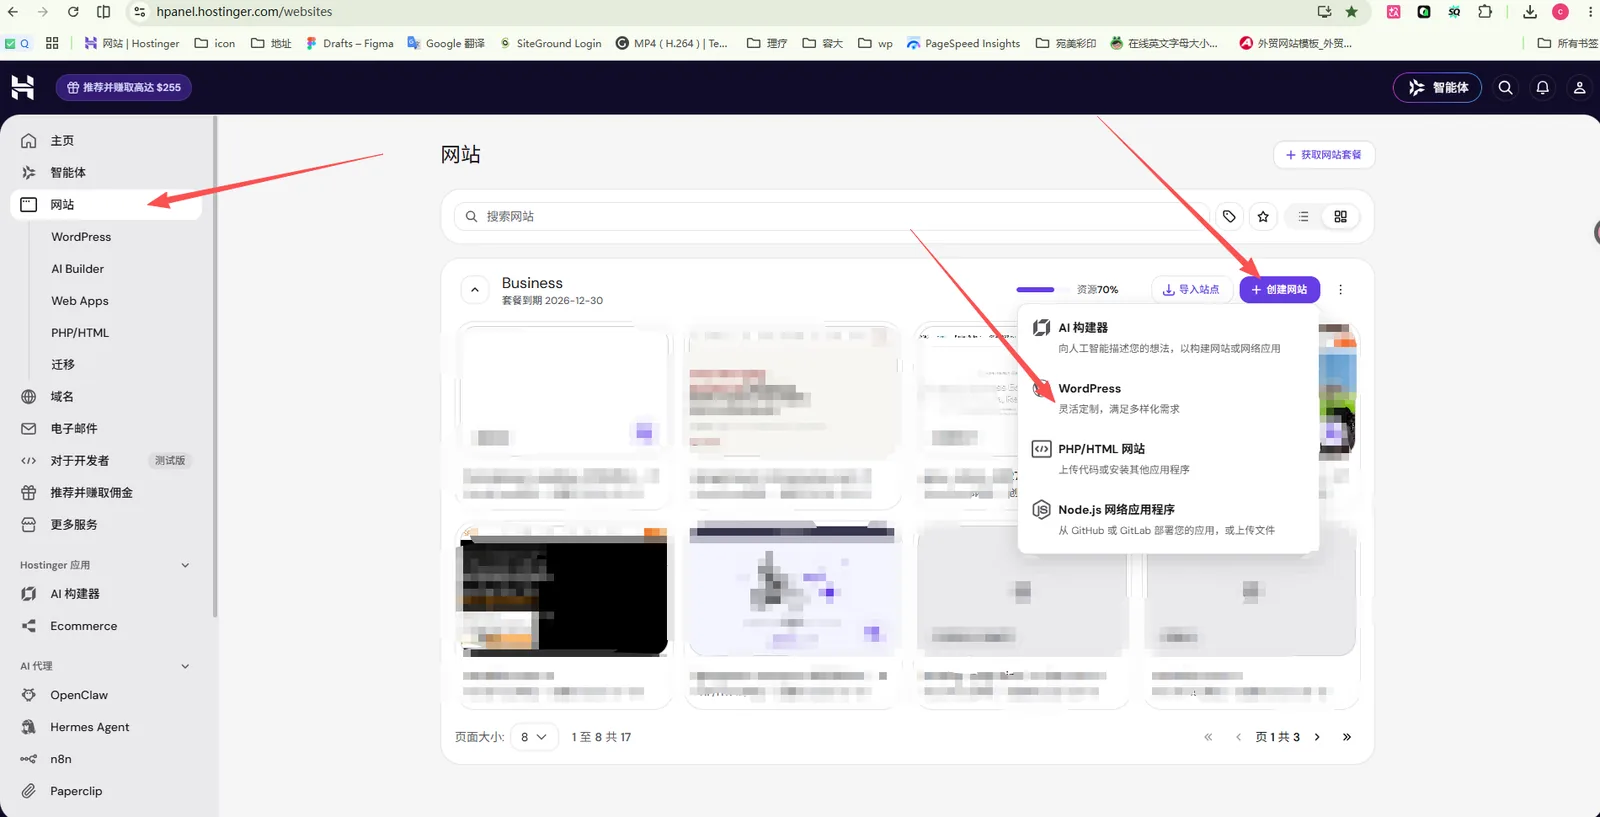
2. Locate the WordPress installation entry point.
In the backend, find the entry point for adding or creating a website, and then select WordPress.
If your plan offers one-click installation, you won't need to download the WordPress program from the official website and upload it yourself.
3. Fill in the website information
Next, you will need to fill in some basic information as prompted on the page, such as:
Website Name
WordPress administrator account
Administrator password
Contact Email
This information is primarily used to create and manage your WordPress website.
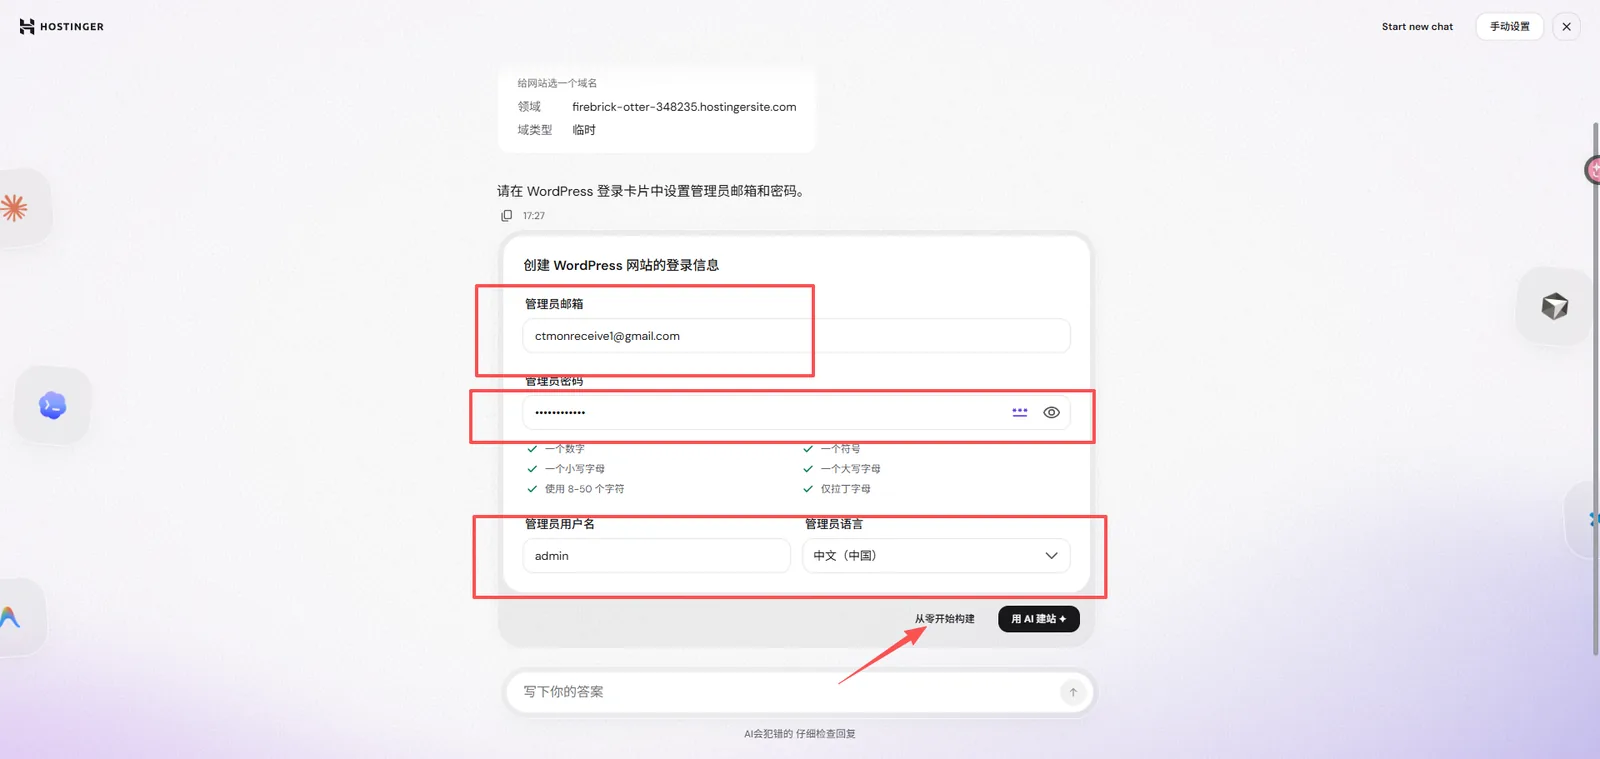
Here's a little reminder: Don't set the administrator account to overly common names like `admin` , `root` , or `test` , and don't use your birthday or phone number as the password.
It is recommended to use a longer, independent password and save it in a password manager.
4. What if I don't have a formal domain name?
If you haven't purchased or bound a formal domain name yet, some hosting providers support creating a website using a temporary domain name.
You can first use a temporary domain name to set up the website and familiarize yourself with the backend operation, and then bind the official domain name later.
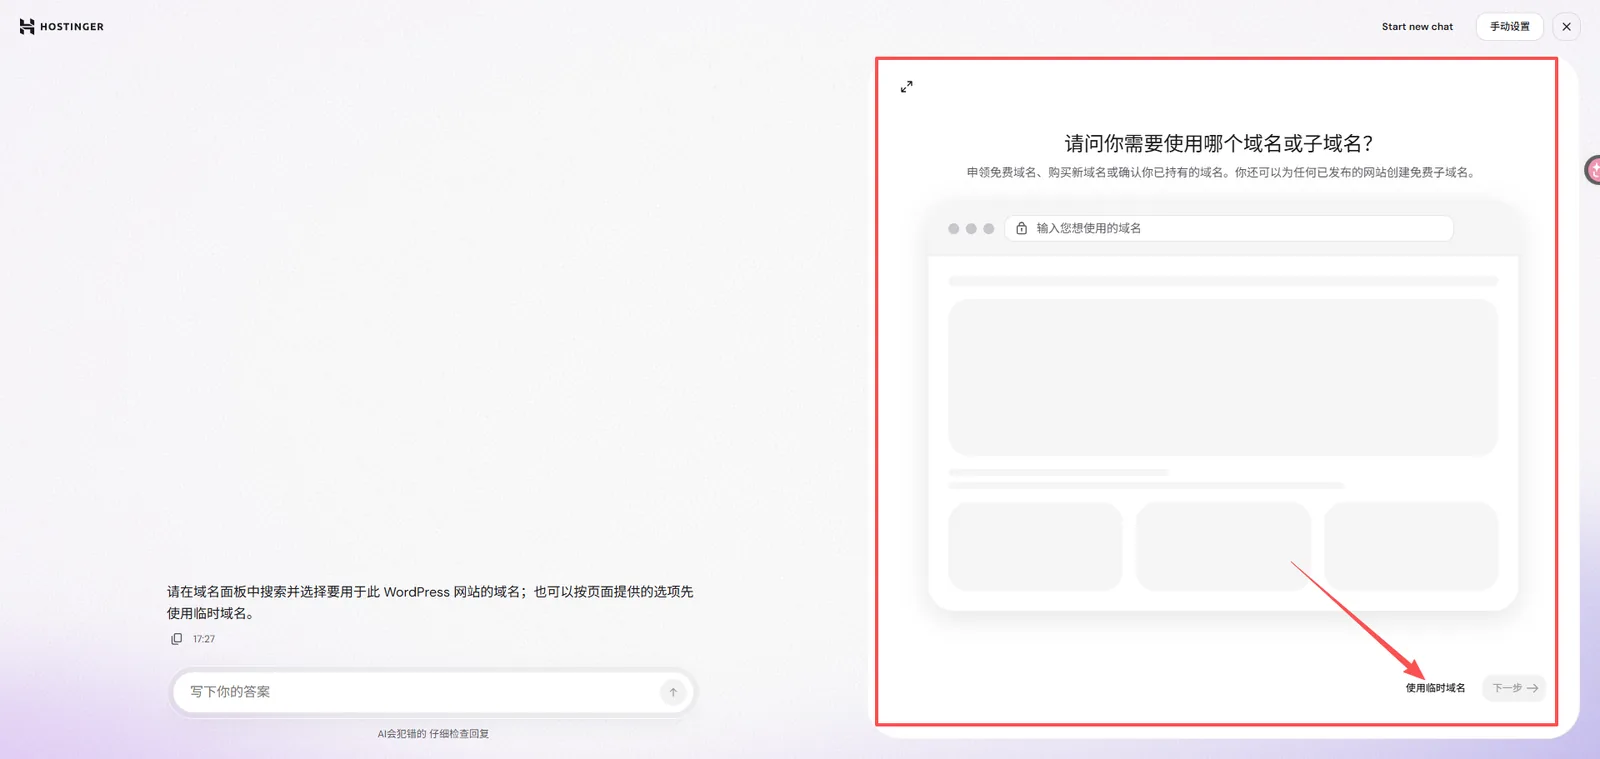
The original example also includes selection options related to AI website building.
If you simply want to learn the basics of WordPress using this tutorial, you can start with the standard WordPress installation method. If you want to try AI-assisted website generation, you can follow the functions provided in the current backend.
Please note that the specific buttons and functions may differ between different versions of the Hostinger installation wizard; please refer to the actual page for details.
5. Installation complete, log in to the WordPress admin panel.
After filling in the information, click "Create" or "Install" and wait for the system to complete the configuration.
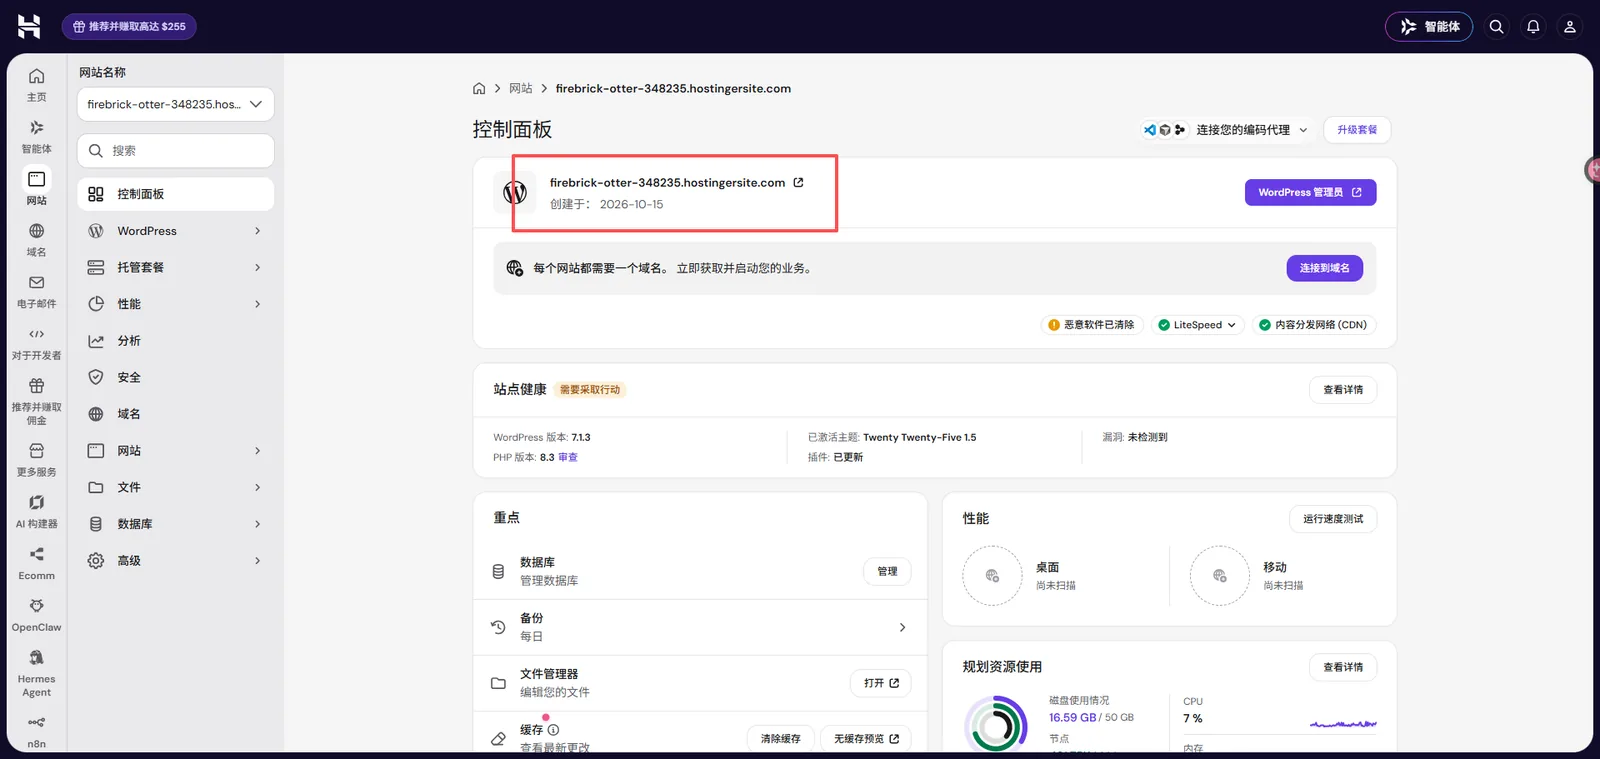
After successful creation, you will usually get two entry points:
One is the website front end, which is the website that visitors see.
The other is the website backend, used to modify pages, publish articles, install plugins, and manage the website.
You can usually access the WordPress admin panel through the following address:
`https://你的域名/wp-admin/`
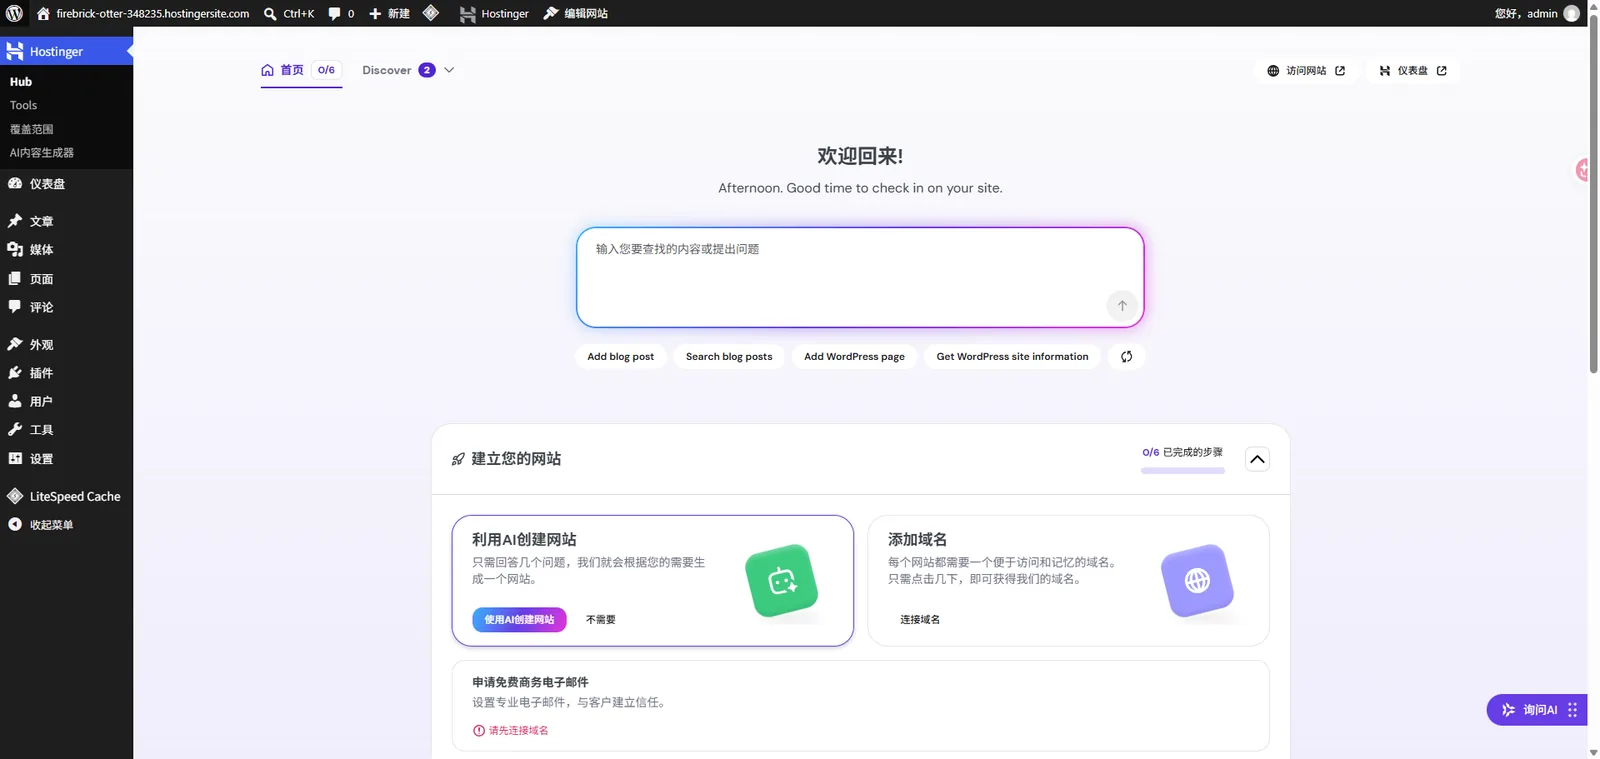
If you are still using a temporary domain name, you can try accessing it by adding `/wp-admin/` to the end of the temporary domain name, or you can access it directly from the hosting management panel.
At this point, your website is already running.
However, don't rush to release it.
A newly installed WordPress site usually comes with the default theme, sample posts, and default settings, which need to be adjusted.
Fourth, the third step: four basic settings, it's best to do them now.
A newly installed WordPress site may have some default settings that may not be suitable for your actual website.
It is recommended to handle the following four things first to avoid having to come back and make changes later.
1. Modify permalinks
Go to the WordPress admin panel and find:
Settings → Permalink
Permalinks are the URL structure of each article and page.
For example, an article introducing WordPress can use:
`example.com/what-is-wordpress/`
For newly built websites, you can consider using an "article name" structure or custom links according to the website's section plan.
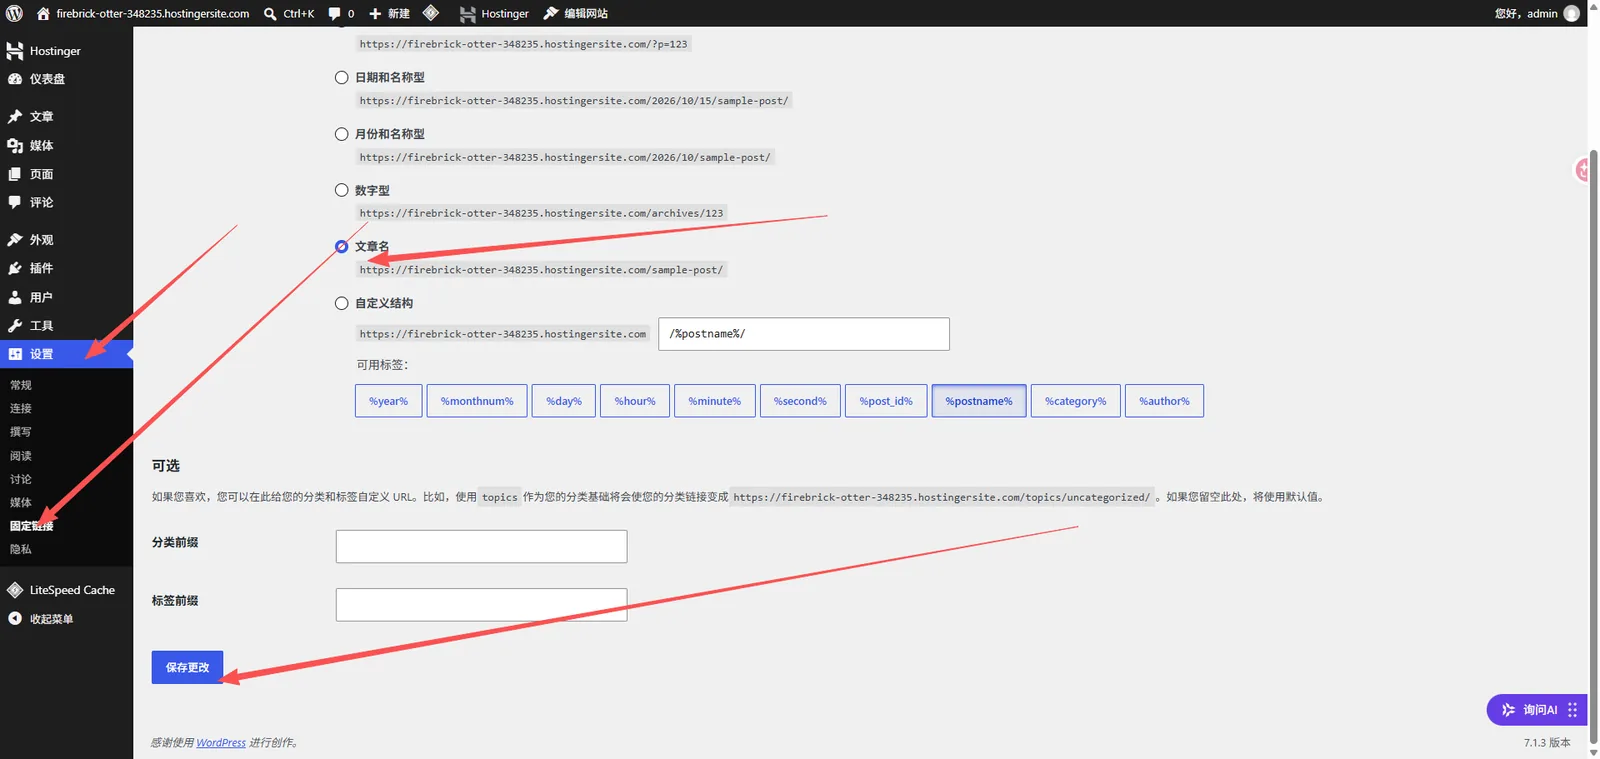
After making your selection, remember to click "Save".
It's important to note that if your website is already live and your pages are indexed by search engines, do not arbitrarily change the original URLs. If adjustments are absolutely necessary, you'll also need to handle redirects from the old to the new URLs.
2. Set the time zone
Go to "Settings → General" and find the time zone setting.
Choose the appropriate time zone based on your website's operational needs.
Otherwise, even if you publish an article today, the time recorded in the backend may not be consistent with the expected time.
3. Check registration and comment settings.
If the website does not require user registration, you can disable the public registration function for now.
The same applies to comments. If you don't plan to enable comments, you can disable them; if you need the comment function, it's recommended to enable moderation and anti-spam measures.
This can reduce unnecessary spam registrations and spam comments.
4. Delete the default example content.
After WordPress is installed, there are usually default posts, pages, or comments.
For example, the well-known "Hello world!".
These are just examples provided by the system and are not your actual website content.
Before the official launch, remember to remove any unnecessary sample content.
Additionally, check if the website address is correct, if HTTPS can be accessed normally, and if WordPress has enabled "suggest that search engines not index this site".
These areas are not complicated, but the earlier you check them, the less trouble you'll have later.
Fifth, the fourth step: Choose a theme, don't rush to install too many.
After WordPress is installed, you might think:
Why is my website different from what I imagined? It looks too ordinary.
Don't worry, this is usually because the website is still using the default theme.
A theme can be understood as a website's "appearance template." It determines the general look of the page, where the menus are placed, and how the articles are arranged.
Go to the WordPress admin panel and find:
Appearance → Theme
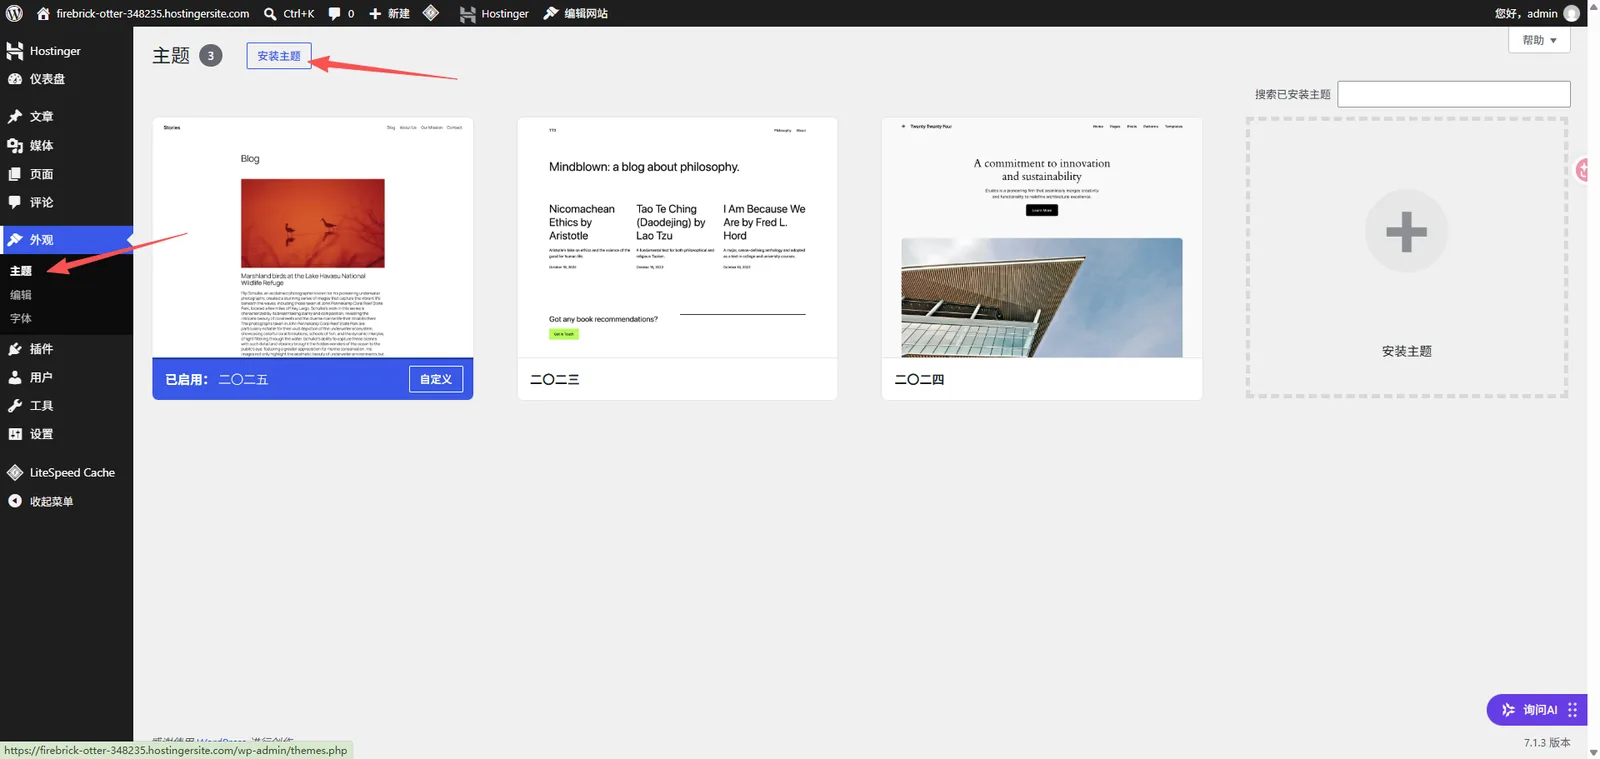
Click "Add Theme" to see the catalog of free themes offered by WordPress.
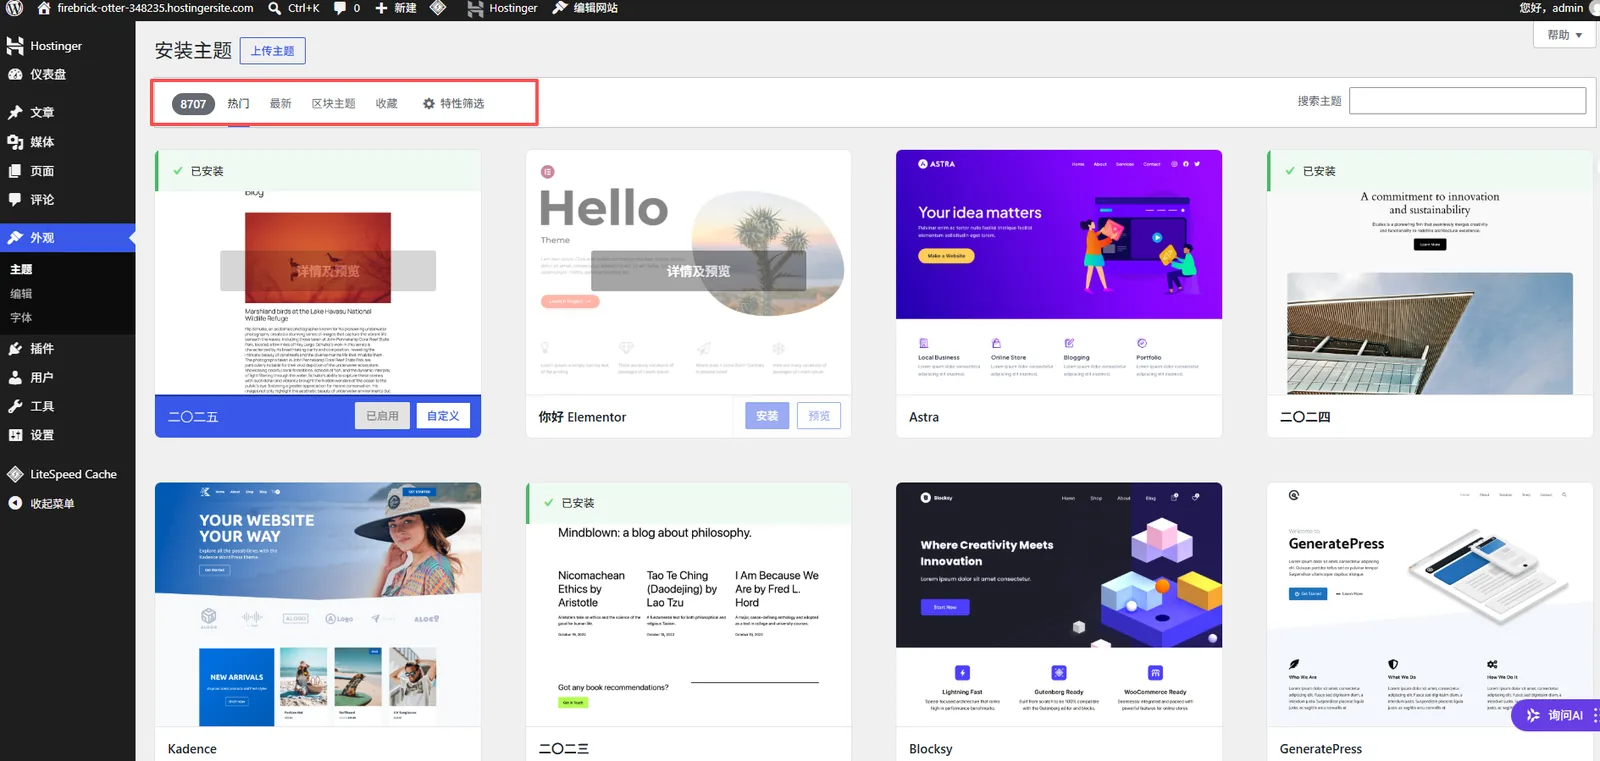
Here's a common problem: beginners are particularly attracted to themes that are feature-rich and have cool effects.
However, having many functions doesn't necessarily mean they're right for you.
Some themes come with many features that aren't currently needed, which can increase page resources and configuration complexity. Modifying something later might then become much more difficult.
Therefore, I suggest you first figure out what kind of feeling you want your website to convey.
Is it a clean and professional corporate website? Or a content blog primarily featuring articles? Or perhaps a B2B export website showcasing a large number of products?
First, determine the direction, then find two or three candidate topics, compare them, and choose the suitable one.
You don't need to install five or six themes at once and try them one by one.
After making your selections, first check the effect on the homepage, article pages, and mobile devices. If the text size, spacing, and menu position display correctly, then you can gradually adjust the colors and details.
For beginners, choosing a theme that is easy to use and maintain later is more practical than pursuing complex visual effects.
VI. Step 5: More plugins are not necessarily better.
If the theme determines what a WordPress website looks like, then plugins determine what it can do.
For example, if you want customers to fill out an inquiry form, you can install a form plugin; if you want to set SEO titles and descriptions for articles, you can install an SEO plugin; if you're worried about losing website data, you can configure a backup function.
This is the function of WordPress plugins.
Plugins are a superpower of WordPress, and also an area that needs careful management.
When you first start using WordPress, you might think this plugin is good and that plugin is useful, and end up installing a whole bunch of them.
There's no need to do that.
It is recommended to keep three principles in mind.
First, for each plugin you install, you should know exactly what problem it solves.
If you can't explain its purpose, then don't install it yet.
Second, try to avoid functional duplication.
For example, if two plugins are managing the same SEO settings or controlling page caching at the same time, configuration conflicts may occur.
Third, check if it is regularly maintained before installation.
Pay close attention to the plugin's update history, compatible versions, and user feedback. Be especially cautious with plugins that haven't been maintained for a long time.
For a newly established website, the following features can be considered based on actual needs:
| Function | What problem is it used to solve? |
|---|---|
| SEO | Set SEO titles, descriptions, and other basic information. |
| cache | Improve the loading efficiency of some pages |
| Image optimization | Compress images to reduce unnecessary file size. |
| Backup | Prevent accidental loss of website files and databases |
| Safety protection | Strengthen login protection and security monitoring |
| Contact Form | To facilitate visitors submitting inquiry information |
These functions don't necessarily have to be implemented through separate plugins; some hosts or themes already provide the relevant capabilities.
There's no need to set an absolute standard for the number of plugins. What really matters is whether the plugins are useful, compatible, and secure.
VII. Common WordPress Website Building Issues
1. How much does it cost to build a WordPress website from scratch?
If you are building a basic website yourself, the main costs usually come from the domain name and hosting.
A regular domain name might cost tens to hundreds of yuan per year, while an entry-level web hosting service might cost several hundred yuan or more per year, depending on the domain name suffix, hosting plan, purchase period, and renewal price.
If commercial themes, paid plugins, or custom development are required later, additional costs will apply.
Therefore, the fact that WordPress software is free does not mean that building and operating a website is completely free.
2. Do I need to register my account if I use an overseas web hosting service?
If a website is deployed on a server located in mainland China, it is usually necessary to apply for ICP filing in accordance with relevant regulations.
If you use an overseas host, you generally do not need to go through the ICP filing process in mainland China, but you still need to comply with other applicable laws and regulations.
In addition, the location of the server will also affect the access experience in different regions.
3. Is it absolutely necessary to use WordPress?
uncertain.
WordPress is just one option for building a website.
If you want to manage your content long-term, have the freedom to choose your hosting provider, and add features based on your business needs, self-hosting WordPress is a worthwhile option to consider.
However, if you value simplicity and convenience more, you can also compare other website building platforms.
Before making a choice, in addition to considering whether it works well now, you can also think about: will it be troublesome to modify the function, migrate the content or change the service provider in the future?
4. Is it suitable for someone with absolutely no technical knowledge to build it themselves?
If you're just building a personal blog or a website with simple functions, you can start with WordPress one-click installation and learn as you go.
If it's a corporate website intended for long-term operation, or a B2B export website involving multilingual support, product display, customized functions, and overseas promotion, then a judgment needs to be made based on the actual situation.
You can learn it yourself, or you can entrust it to a professional website building service provider.
At this point, a basic WordPress website has been set up. From purchasing a domain name and hosting, to installing WordPress, and configuring themes and plugins, the preliminary preparations are basically complete.
However, just because a website is accessible doesn't mean it's ready for official use. Further steps include content refinement, form checking, backups, and website speed optimization.
We will continue to cover these tasks in the next article , "WordPress Online Website Building Tutorial (Part 2)" .
Author: CTMON | B2B Digital Marketing Service Provider
References and Information Sources
WordPress official website: https://wordpress.org/
WordPress Official Installation Instructions: https://wordpress.org/documentation/article/how-to-install-wordpress/
WordPress official theme directory: https://wordpress.org/themes/
WordPress official plugin directory: https://wordpress.org/plugins/
Note: This article uses Hostinger and its hPanel backend as operational examples. Related functions, interfaces, and package rules may be adjusted with different versions. Please refer to your specific hosting backend for actual operation. The hosting examples in this article do not represent commercial recommendations.

What does international social media management service include? 2026 Guide to Social Media Management for Export Businesses
2026-10-28
How to write a WordPress product page that will make overseas buyers want to send inquiries?
2026-10-28
How to fix WordPress form emails not sending: Practical WP Mail SMTP configuration
2026-10-27

Are foreign trade promotion companies reliable? Six key criteria for businesses to judge promotion service providers in 2026.
2026-10-26
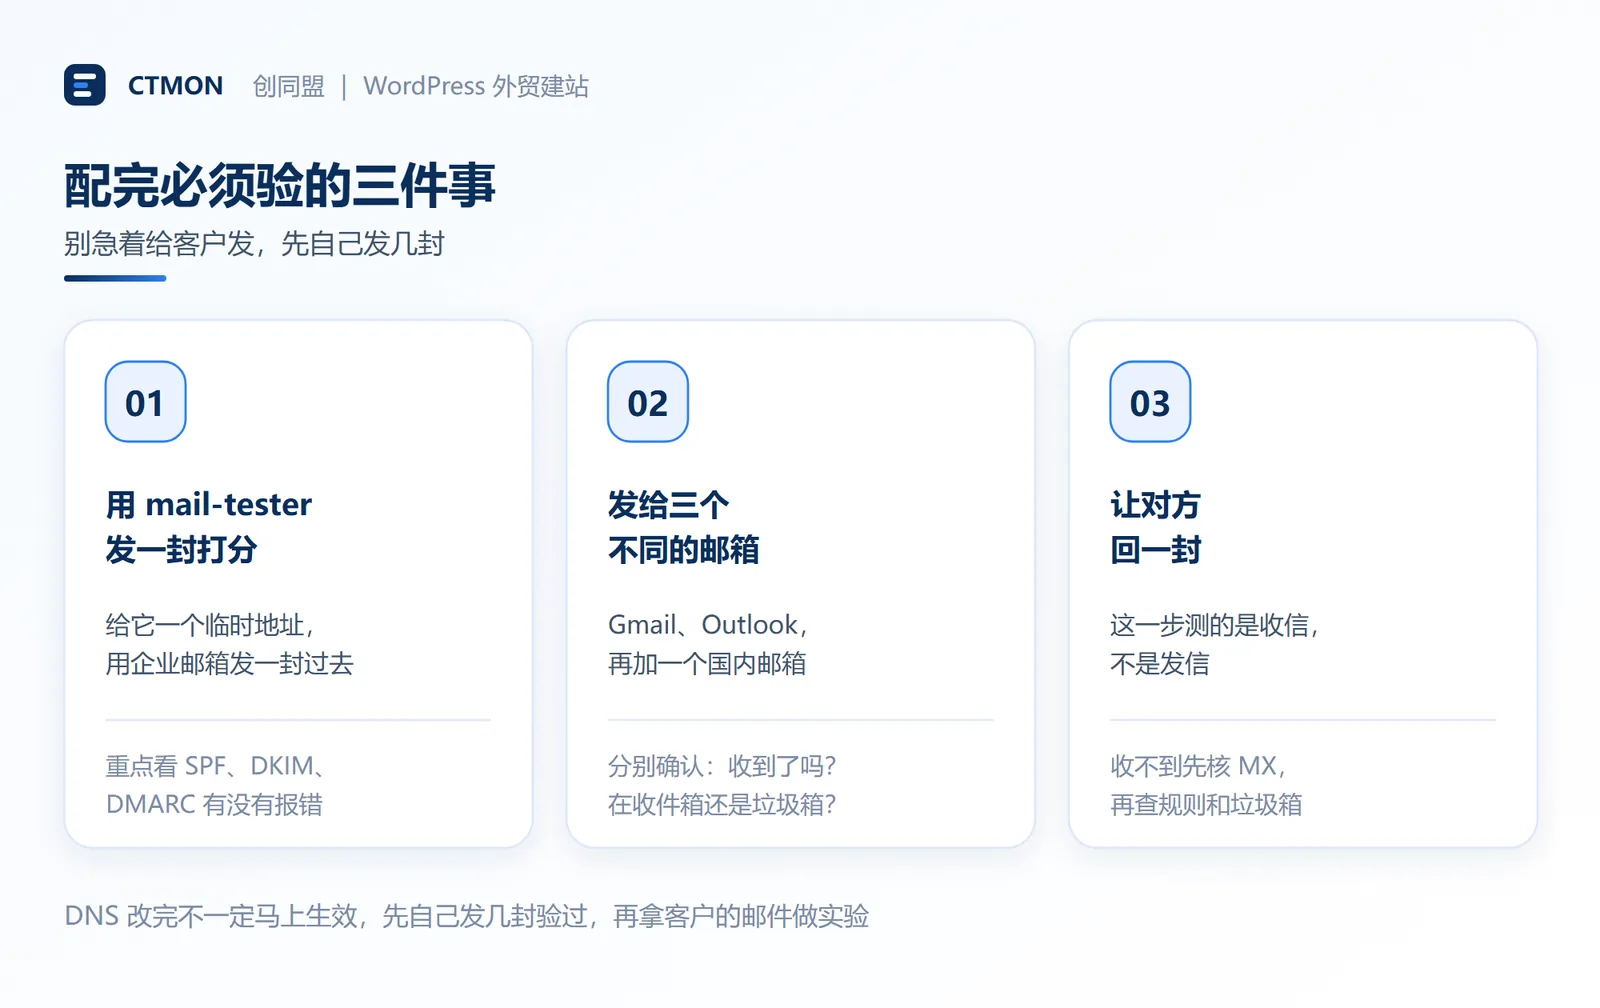
How do I set up an email account for export businesses? How can I configure it to avoid it ending up in the spam/junk mail folder?
2026-10-26
Related Articles
How to configure WPForms contact forms: Which should I choose, WPForms or Contact Form 7?
How to write a WordPress product page that will make overseas buyers want to send inquiries?
How to fix WordPress form emails not sending: Practical WP Mail SMTP configuration
How do I set up an email account for export businesses? How can I configure it to avoid it ending up in the spam/junk mail folder?
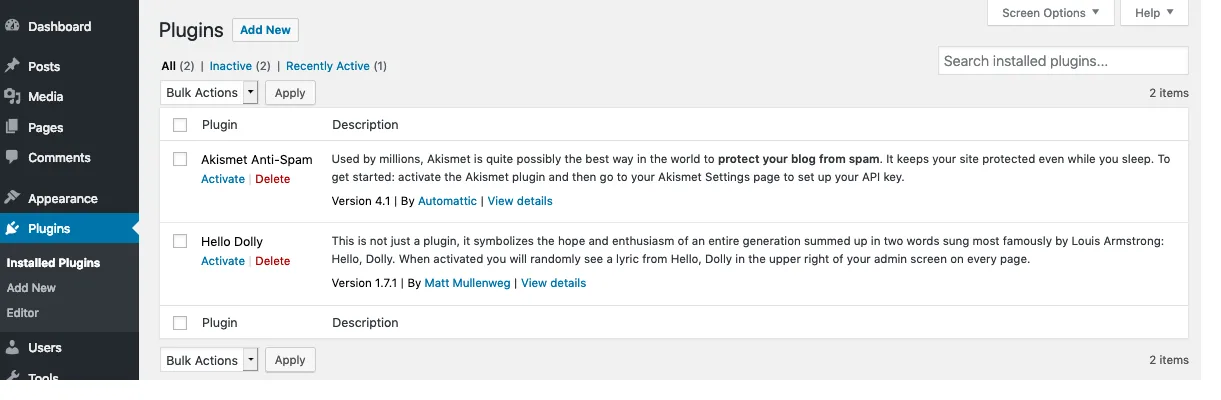
Recommended essential WordPress plugins: 6 types of plugins commonly used for B2B export websites

